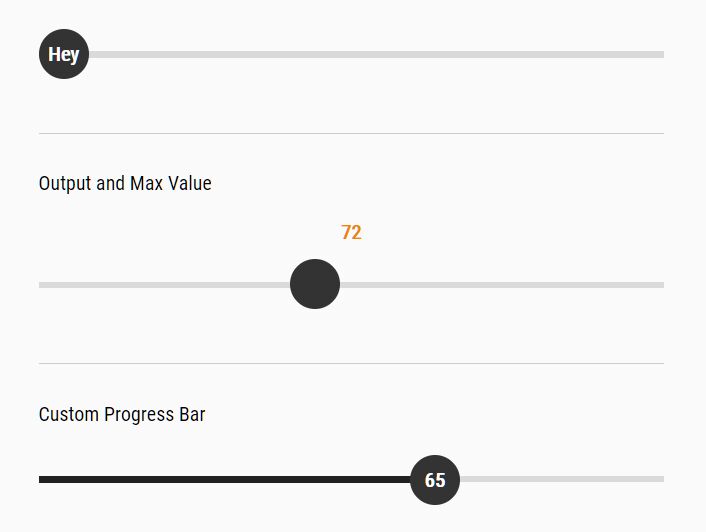
Custom Slim Range Slider With CSS And jQuery
| File Size: | 1.94 KB |
|---|---|
| Views Total: | 8170 |
| Last Update: | |
| Publish Date: | |
| Official Website: | Go to website |
| License: | MIT |
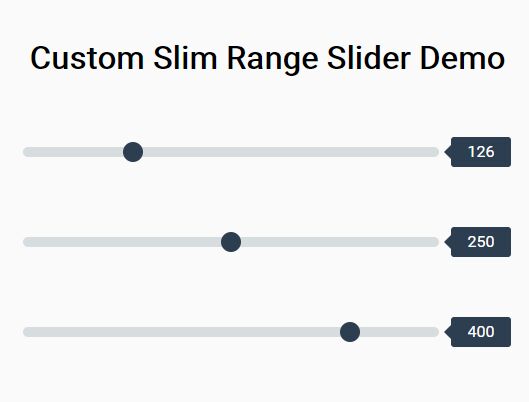
This is a pure CSS solution to create slim, beautiful, range sliders with custom handles and labels. jQuery is used only to handle values displayed in the labels as you drag the range slider.
How to use it:
1. The basic HTML structure for the range slider. Note that it supports the native input attributes:
<div class="range-slider">
  <input class="range-slider__range" type="range" value="100" min="0" max="500">
  <span class="range-slider__value">0</span>
</div>
2. Apply custom CSS styles to the range slider.
.range-slider__range {
  -webkit-appearance: none;
  width: calc(100% - (73px));
  height: 10px;
  border-radius: 5px;
  background: #d7dcdf;
  outline: none;
  padding: 0;
  margin: 0;
}

/* custom thumb */
.range-slider__range::-webkit-slider-thumb {
 -webkit-appearance: none;
 appearance: none;
 width: 20px;
 height: 20px;
 border-radius: 50%;
 background: #2c3e50;
 cursor: pointer;
 -webkit-transition: background .15s ease-in-out;
 transition: background .15s ease-in-out;
}

.range-slider__range::-webkit-slider-thumb:hover {
 background: #1abc9c;
}

.range-slider__range:active::-webkit-slider-thumb {
 background: #1abc9c;
}

.range-slider__range::-moz-range-thumb {
 width: 20px;
 height: 20px;
 border: 0;
 border-radius: 50%;
 background: #2c3e50;
 cursor: pointer;
 -webkit-transition: background .15s ease-in-out;
 transition: background .15s ease-in-out;
}

.range-slider__range::-moz-range-thumb:hover {
 background: #1abc9c;
}

.range-slider__range:active::-moz-range-thumb {
 background: #1abc9c;
}

.range-slider__range:focus::-webkit-slider-thumb {
 -webkit-box-shadow: 0 0 0 3px #fff, 0 0 0 6px #1abc9c;
 box-shadow: 0 0 0 3px #fff, 0 0 0 6px #1abc9c;
}

/* custom label */
.range-slider__value {
  display: inline-block;
  position: relative;
  width: 60px;
  color: #fff;
  line-height: 20px;
  text-align: center;
  border-radius: 3px;
  background: #2c3e50;
  padding: 5px 10px;
  margin-left: 8px;
}

.range-slider__value:after {
  position: absolute;
  top: 8px;
  left: -7px;
  width: 0;
  height: 0;
  border-top: 7px solid transparent;
  border-right: 7px solid #2c3e50;
  border-bottom: 7px solid transparent;
  content: '';
}

/* custom track */
::-moz-range-track {
  background: #d7dcdf;
  border: 0;
}

/* remove border */
  input::-moz-focus-inner, input::-moz-focus-outer {
  border: 0;
}
3. Import the latest version of jQuery library into the document.
<script src="https://code.jquery.com/jquery-3.3.1.slim.min.js"
        integrity="sha384-q8i/X+965DzO0rT7abK41JStQIAqVgRVzpbzo5smXKp4YfRvH+8abtTE1Pi6jizo"
        crossorigin="anonymous">
</script>
4. The jQuery script to update the slider label when you change the value.
var rangeSlider = function(){
var slider = $('.range-slider'),
    range = $('.range-slider__range'),
    value = $('.range-slider__value');

slider.each(function(){

  value.each(function(){
    var value = $(this).prev().attr('value');
    $(this).html(value);
  });

  range.on('input', function(){
    $(this).next(value).html(this.value);
  });
});
};

rangeSlider();
This awesome jQuery plugin is developed by Sean Stopnik. For more Advanced Usages, please check the demo page or visit the official website.