Responsive E-commerce Shopping Cart Plugin with jQuery - Shopping Mall
| File Size: | 9.68 MB |
|---|---|
| Views Total: | 24933 |
| Last Update: | |
| Publish Date: | |
| Official Website: | Go to website |
| License: | MIT |
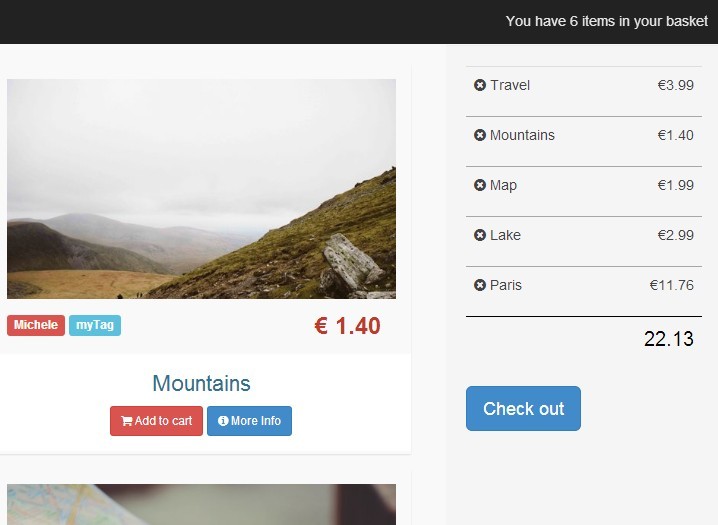
Shopping Mall is a fully responsive jQuery based shopping cart application used to easily and quickly integrate an online store to your website/blog.
Features:
- Displays a sticky shopping cart on the right side of your website.
- Easily add/remove items.
- Displays how many items in your basket.
- Sliding lightbox checkout interface.
- Displays the total price of all items in the shopping cart.
- Product list view & detail view with add to cart CTA buttons.
Dependencies:
- jQuery
- Bootstrap 3
- Font Awesome 4
- Backbone.js
- Underscore.js
- Bootstrap 3 Lightbox
How to use it:
1. Add the required stylesheets in the head of your document.
<!-- Bootstrap CSS -->
<link href="//netdna.bootstrapcdn.com/bootstrap/3.2.0/css/bootstrap.min.css" rel="stylesheet" >
<link href="//netdna.bootstrapcdn.com/font-awesome/4.1.0/css/font-awesome.min.css" rel="stylesheet">

<!-- Lightbox CSS -->
<link href="css/lightbox.css" rel="stylesheet">
<link href="css/dark.css" rel="stylesheet">

<!-- Custom styles -->
<link rel="stylesheet"  href="css/style.css">
2. Add the dependencies at the bottom of the document.
<script src="http://code.jquery.com/jquery-1.11.1.min.js"></script>
<script src="http://netdna.bootstrapcdn.com/bootstrap/3.2.0/js/bootstrap.min.js"></script>
<script src="js/libs/underscore-min.js"></script>
<script src="js/libs/backbone-min.js"></script>
<script src="js/libs/lightbox.js"></script>
<script src="js/store.js"></script>
3. Template for the single picture box in store page
<script type="text/template" id="tmp-pictureItem">
  <div class="shoppingListItemContent">
    <a href="<%= image %>" data-toggle="lightbox">
      <img src="<%= thumb %>" class="img-responsive" />
    </a>
    <!-- Button trigger modal -->
    <div class="clearfix">
      <div class="product-tags pull-left">
        <span class="label label-danger"><%= photographer %></span>
        <span class="label label-info"><%= tag %></span>
      </div>
      <div class="product-price pull-right">
        <span class="price">€ <%= price.toFixed(2) %></span>
      </div>
    </div>
    <div class="infos">
      <h4 class="name text-info"><%= title %></h4>
      <button id="addCart" class="btn btn-danger btn-sm"><i class="fa fa-shopping-cart"></i> Add to cart</button>
      <button id="moreInfo" class="btn btn-primary btn-sm hidden-md"><i class="fa fa-info-circle"></i> More Info</button>
    </div>
  </div>
</script>
4. Template for the single picture box in detail view
<script type="text/template" id="tmp-details">
  <div class="col-md-6">
    <a href="<%= image %>" data-toggle="lightbox"><img src="<%= image %>" class="img-responsive"/></a>
  </div>
  <div class="col-md-6">
    <div class="product-tags">
      <span class="label label-danger"><%= photographer %></span>
      <span class="label label-info"><%= tag %></span>
    </div>
    <h4><%= title %></h4>
    <p class="description"><%= description %></p>
    <div class="row">
      <div class="col-sm-3">
        <div class="product-price">€ <%= price.toFixed(2) %></div>
      </div>
      <div class="col-sm-6 col-md-offset-3">
        <button id="cart" class="btn btn-lg btn-danger"><i class="fa fa-shopping-cart"></i> Add to cart</button>
      </div>
    </div>
  </div>
  <button id="back" class="btn btn-default"><i class="fa fa-chevron-left"></i> Back</button>
</script>
5. Create a header navigation for your online store.
<div class="navbar navbar-inverse navbar-fixed-top" role="navigation">
  <div class="container-fluid">
    <div class="navbar-header">
      <button type="button" class="navbar-toggle collapsed" data-toggle="collapse" data-target=".navbar-collapse"> <span class="sr-only">Toggle navigation</span> <span class="icon-bar"></span> <span class="icon-bar"></span> <span class="icon-bar"></span> </button>
      <a class="navbar-brand" href="index.html">
      <div class="circular"></div>
      My shopping mall</a> </div>
    <div class="navbar-collapse collapse">
      <h2 id="basket-message" class="text-right">You have <span id="basket">0</span> items in your basket</h2>
    </div>
  </div>
</div>
6. Create the layout for the online store with a sidebar shopping cart.
<div class="container-fluid">
<div class="row">

<div class="col-sm-9  col-md-10  main" id="main">
  <div class="">
    <div id="app"></div>
  </div>
  <div class="row">
    <ul id="default-item-list" class="col-md-12">
    </ul>
  </div>
  <div class="row">
    <div id="detail"></div>
  </div>
</div>

<div class="col-sm-3 col-sm-offset-3 col-md-2 col-md-offset-2 sidebar" id="sidebar">
<table id="shopping-cart" class="table table-responsive">
  <tbody id="shopping-list">
  </tbody>
  <tfoot>
    <tr>
      <td colspan="4" id="total">€ 0.00</td>
    </tr>
  </tfoot>
</table>
<button class="btn btn-primary btn-lg" data-toggle="modal" data-target="#myModal" id="showForm">
Check out
</div>

</div>
</div>
7. Create a modal box for the check out interface.
<div class="modal fade" id="myModal" tabindex="-1" role="dialog" aria-labelledby="myModalLabel" aria-hidden="true" data-backdrop="static"
   data-keyboard="false">
  <div class="modal-dialog">
    <div class="modal-content">
      <div class="modal-header">
        <h4 class="modal-title" id="myModalLabel">Check them out</h4>
      </div>
      <div class="modal-body">
        <form id="sendMail">
          <p>Please insert your personal data and we'll send you the availability of the selected photos</p>
          <fieldset>
            <div class="row">
              <div class="form-group col-sm-12">
                <label for="name">Your name:<span>*</span></label>
                <input type="text" class="form-control " placeholder="Your name:" id="name" required>
                <div class="alert alert-danger">Name field is empty</div>
              </div>
            </div>
            <div class="row">
              <div class="form-group col-sm-12">
                <label for="email">Your email:<span>*</span></label>
                <input type="email" class="form-control " placeholder="Your email:" id="email" required>
                <div class="alert alert-danger">Email field is empty or invalid</div>
              </div>
            </div>
            <div class="row">
              <div class="form-group col-sm-12">
                <label for="message">Your message:<span>*</span></label>
                <textarea class="form-control" placeholder="Your message:" id="message" required></textarea>
                <div class="alert alert-danger">Please leave a message</div>
                <span class="form-info"><span class="required">*</span> These fields are required</span> </div>
            </div>
          </fieldset>
        </form>
        <div id="thanks">
          <h1>Thanks.</h1>
          <p>We'll send you an acceptance email shortly.</p>
          <a class="btn btn-default" onclick="location.reload();">Close</a> </div>
      </div>
      <div class="modal-footer">
        <button type="button" class="btn btn-default" data-dismiss="modal">Close</button>
        <button type="button" class="btn btn-danger" id="sendMailButton">Check out!</button>
      </div>
    </div>
  </div>
</div>
8. Open the store.js and create your own item list.
var items = [
{
  id:'1',
  title: 'Title 1',
  thumb:'img/thumb/1.jpg',
  image:'img/1.jpg',
  price: 2.99,
  photographer:'Bob',
  tag:'myTag',
  description:'Description.'
},
{
  id:'2',
  title: 'Title 2',
  thumb:'img/thumb/2.jpg',
  image:'img/2.jpg',
  price: 1.99,
  photographer:'Bob',
  tag:'myTag',
  description:'Description.'
},

{
  id:'3',
  title: 'Title 3',
  thumb:'img/thumb/3.jpg',
  image:'img/1.jpg',
  price: 3.99,
  photographer:'Bob',
  tag:'myTag',
  description:'Description.'
},
...
This awesome jQuery plugin is developed by gentax. For more Advanced Usages, please check the demo page or visit the official website.