jQuery Plugin For Tabbed Image Slider & Navigation - Ottoman Slider
| File Size: | 2.04 MB |
|---|---|
| Views Total: | 2933 |
| Last Update: | |
| Publish Date: | |
| Official Website: | Go to website |
| License: | MIT |
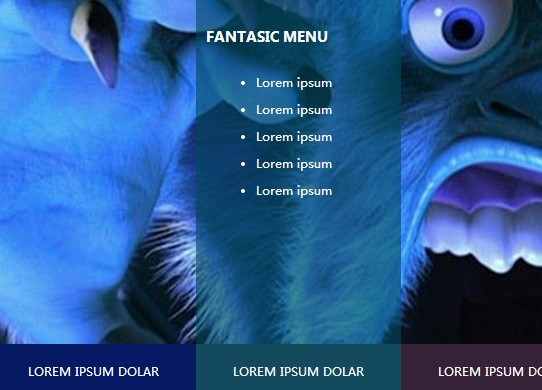
Ottoman Slider is a jQuery plugin which allows you to create a stylish tabbed navigation with background images switching on mouse hover.
How to use it:
1. Include jQuery library and the jQuery ottoman slider plugin in the document.
<script src="//code.jquery.com/jquery-1.11.1.min.js"></script>
<script src="js/jquery.ottomanslider.js"></script>
2. Include the required memoslider.css to style the slider.
<link href="css/memoslider.css" rel="stylesheet">
3. Create the Html for the slider. Insert the background images using data-bg attribute.
<div class="banner-wrapper" id="ottomanslider">
  <div class="main-image"></div>
  <div class="thumbs">
      <div class="thumb t1" data-bg="img/sample1.jpg" data-id="1">
    <a class="button" href="#">Menu 1</a>
      </div>
      <div class="thumb t2" data-bg="img/sample2.jpg" data-id="2">
    <a class="button" href="#">Menu 2</a>
      </div>
      <div class="thumb t3" data-bg="img/sample3.jpg" data-id="3">
    <a class="button" href="#">Menu 3</a>
      </div>
      <div class="thumb t4" data-bg="img/sample4.jpg" data-id="4">
    <a class="button" href="#">Menu 4</a>
      </div>
      <div class="thumb t5" data-bg="img/sample5.jpg" data-id="5">
    <a class="button" href="#">Menu 5</a>
      </div>
  </div>
</div>
4. Add sub-menu items using JS data array, the data structure should be like this:
var data = [
  {
    "menu": {
      "id": "1",
      "title": "Menu 1",
      "item": [
       {
         "text": "Lorem İpsum",
         "url": "#",
         "title": "1"
       },
       {
         "text": "Lorem İpsum",
         "url": "#",
         "title": "2"
       },
       {
         "text": "Lorem İpsum",
         "url": "#",
         "title": "3"
       },
       {
         "text": "Lorem İpsum",
         "url": "#",
         "title": "4"
       },
       {
         "text": "Lorem İpsum",
         "url": "#",
         "title": "5"
       }
      ]
    }
  },
   {
     "menu": {
      "id": "2",
      "title": "Menu 2",
      "item": [
        {
           "text": "Lorem İpsum",
           "url": "#",
           "title": "1"
        },
        {
           "text": "Lorem İpsum",
           "url": "#",
           "title": "2"
        },
        {
           "text": "Lorem İpsum",
           "url": "#",
           "title": "3"
        },
        {
           "text": "Lorem İpsum",
           "url": "#",
           "title": "4"
        },
        {
           "text": "Lorem İpsum",
           "url": "#",
           "title": "5"
        }
      ]
     }
   },
   {
     "menu": {
      "id": "3",
      "title": "Menu 3",
      "item": [
        {
           "text": "Lorem İpsum",
           "url": "#",
           "title": "1"
        },
        {
           "text": "Lorem İpsum",
           "url": "#",
           "title": "2"
        },
        {
           "text": "Lorem İpsum",
           "url": "#",
           "title": "3"
        },
        {
           "text": "Lorem İpsum",
           "url": "#",
           "title": "4"
        },
        {
           "text": "Lorem İpsum",
           "url": "#",
           "title": "5"
        }
      ]
     }
   },
   {
     "menu": {
      "id": "4",
      "title": "Menu 4",
      "item": [
        {
           "text": "Lorem İpsum",
           "url": "#",
           "title": "1"
        },
        {
           "text": "Lorem İpsum",
           "url": "#",
           "title": "2"
        },
        {
           "text": "Lorem İpsum",
           "url": "#",
           "title": "3"
        },
        {
           "text": "Lorem İpsum",
           "url": "#",
           "title": "4"
        },
        {
           "text": "Lorem İpsum",
           "url": "#",
           "title": "5"
        }
      ]
     }
   },
    {
      "menu": {
       "id": "5",
       "title": "Menu 5",
       "item": [
         {
           "text": "Lorem İpsum",
           "url": "#",
           "title": "1"
         },
         {
           "text": "Lorem İpsum",
           "url": "#",
           "title": "2"
         },
         {
           "text": "Lorem İpsum",
           "url": "#",
           "title": "3"
         },
         {
           "text": "Lorem İpsum",
           "url": "#",
           "title": "4"
         },
         {
           "text": "Lorem İpsum",
           "url": "#",
           "title": "5"
         }
       ]
      }
    }
];
6. Call the plugin to initialize the navigation slider.
$('#ottomanslider').ottomanslider();
7. All the options.
caret: 'bigcaret',
animate: true,
padLeft: 10,
padRight: 10,
padTop: 10,
padBottom: 10,
padding: 0,
copyTitle: false
Change log:
2017-01-28
- JS update
This awesome jQuery plugin is developed by mehmetkurt. For more Advanced Usages, please check the demo page or visit the official website.