Before / After Image Viewer Using jQuery UI Draggable
| File Size: | 2.09 KB |
|---|---|
| Views Total: | 3413 |
| Last Update: | |
| Publish Date: | |
| Official Website: | Go to website |
| License: | MIT |
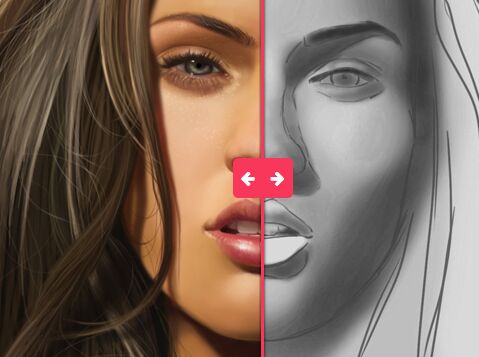
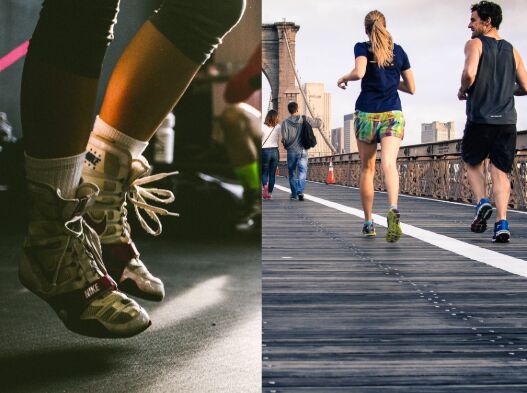
A jQuery/jQuery UI image comparison widget which allows your visitor to view the before / after images by dragging the slider based on the jQuery UI draggable widget.
How to use it:
1. Load the Font Awesome for the drag handle icons.
<link rel="stylesheet" href="font-awesome.min.css">
2. Add before and after images together with a drag handle to the webpage.
<div id="img-container">

  <div id="img-bt" class="img">
    <img src="before.jpg">
  </div>

  <div id="img-top" class="img">
    <div id="mask">
      <img src="after.jpg">
    </div>
    <div id="drag">
      <div id="arrows">
        <i class="fa fa-arrow-left"></i>
        <i class="fa fa-arrow-right"></i>
      </div>
    </div>
  </div>

</div>
3. The primary CSS styles:
#img-container {
  position: relative;
  height: 603px;
  box-shadow: rgba(0,0,0,0.8) 0px 0px 8px;
  -webkit-user-select: none;
  -moz-user-select: none;
  -khtml-user-select: none;
  -ms-user-select: none;
}

.img {
  position: absolute;
  top: 0;
  left: 0;
  width: 100%;
  height: 603px;
}

#img-top {
  position: relative;
  box-shadow: rgba(0,0,0,0.5) 1px 0px 2px;
  min-width: 3px;
  max-width: 500px;
  width: 50.5%;
}

#drag {
  position: absolute;
  width: 3px;
  background: #f9375b;
  height: 100%;
  right: 0;
  top: 0;
  cursor: ew-resize;
  box-shadow: rgba(0,0,0,0.5) -1px 0px 2px;
}

#mask {
  overflow: hidden;
  width: 100%;
}
4. Style the drag handle:
#img-container {
  position: relative;
  height: 603px;
  box-shadow: rgba(0,0,0,0.8) 0px 0px 8px;
  -webkit-user-select: none;
  -moz-user-select: none;
  -khtml-user-select: none;
  -ms-user-select: none;
}

.img {
  position: absolute;
  top: 0;
  left: 0;
  width: 100%;
  height: 603px;
}

#img-top {
  position: relative;
  box-shadow: rgba(0,0,0,0.5) 1px 0px 2px;
  min-width: 3px;
  max-width: 500px;
  width: 50.5%;
}

#drag {
  position: absolute;
  width: 3px;
  background: #f9375b;
  height: 100%;
  right: 0;
  top: 0;
  cursor: ew-resize;
  box-shadow: rgba(0,0,0,0.5) -1px 0px 2px;
}

#mask {
  overflow: hidden;
  width: 100%;
}
5. Load the needed jQuery and jQuery UI libraries at the end of the document.
<script src="jquery.min.js"></script>
<script src="jquery-ui.min.js"></script>
6. The core JavaScript to enable the image comparison widget.
$(document).ready(function(){

  $('.img img').attr('draggable', false);

    $('#drag').on('mousedown', function(e){
        var $dragable = $('#img-top'),
            startWidth = $dragable.width(),
            pX = e.pageX;

        $(document).on('mouseup', function(e){
            $(document).off('mouseup').off('mousemove');
        });

    $(document).on('mousemove', function(me){
            var mx = (me.pageX - pX);

            $dragable.css({
                width: startWidth + mx,
            });


      var l = $('.fa-arrow-left');
      var r = $('.fa-arrow-right');

      if(startWidth + mx > 500){
        r.fadeOut(100);
        r.css('float', 'none');
      }else{
        r.fadeIn(100);
        r.css('float', 'right');
      }

      if(startWidth + mx < 0){
        l.fadeOut(100);
      }else{
        l.fadeIn(100);
      }

        });
    });
});
This awesome jQuery plugin is developed by André Cortellini. For more Advanced Usages, please check the demo page or visit the official website.