Responsive Interactive HTML5 Video Player With jQuery / CSS3
| File Size: | |
|---|---|
| Views Total: | 17958 |
| Last Update: | |
| Publish Date: | |
| Official Website: | Go to website |
| License: | MIT |
This plugin is copyrighted and part of an online business: https://teamtreehouse.com/. The download link and demo page are removed according to the owner's request.
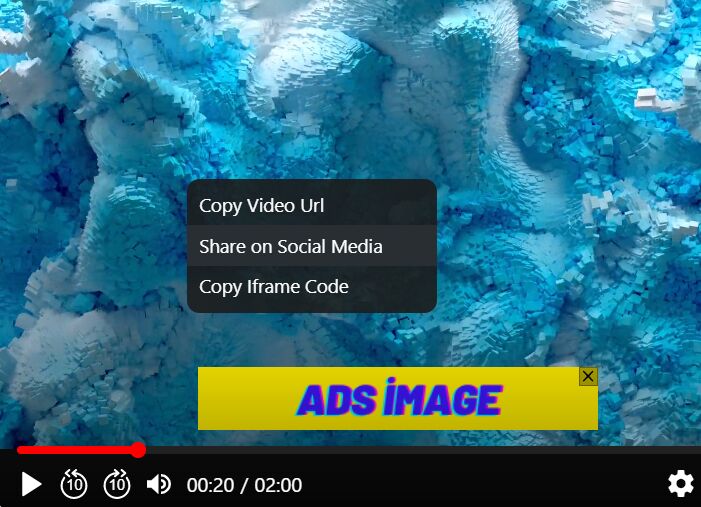
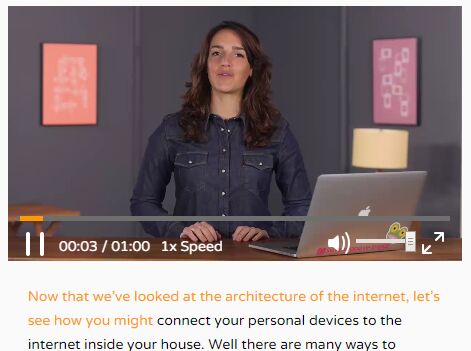
A jQuery based responsive, interactive HTML5 video player with custom controls and transcript support.
Features:
- Allows to play/pause/muse the video.
- Allows to change video playback rate.
- Play/pause on video click or spacebar
- Mute/sound on m key.
- Fullscreen mode supported.
- Hide button controls when video is playing and show button controls on hover.
- Highlight current transcript when video plays.
- Click on transcript to be taken to that time in the video.
How to use it:
1. Embed your HTML5 videos into the webpage.
<video id="video">
  <source src="video/video.mp4" type="video/mp4">
  <source src="video/video.ogg" type="video/ogg">
  <track label="English" kind="subtitles" srclang="en" src="video/captions.vtt" default>
  <p>
    Your browser doesn't support HTML5 video.
    <a href="video/video.mp4">Download</a> the video instead.
  </p>
</video>
2. Add custom controls to the video player.
<div id="videoControls">
  <input type="range" id="progressBar" value="0">
  <span id="progress"></span>
    <div id="buttonControls">
      <button id="play"><img id="playImg" src="icons/play-icon.png" alt="The play icon"></button>
      <span id="duration">00:00 / 01:00</span>
      <button id="fastFwd">1x Speed</button>
      <button id="fullScreen"><img id="fullScreenImg" src="icons/fullscreen-icon.png" alt="The fullscreen icon"></button>
      <input type="range" id="volumeSlider" min="0" max="1" step="0.01" value="1">
      <button id="mute"><img id="muteImg" src="icons/volume-on-icon.png" alt="The mute icon"></button>
    </div>
</div>
3. Add custom transcript to the video.
<div id="transcript">
  <p>
    <span data-start="0">Now that we've looked at the architecture of the internet, let's see how you might</span>
    <span data-start="4.13">connect your personal devices to the internet inside your house. </span>
    <span data-start="7.535">Well there are many ways to connect to the internet, and </span>
    <span data-start="11.27">most often people will connect wirelessly. </span>
    <span data-start="13.96">Let's look at an example of how you can connect to the internet. </span>
    <span data-start="17.94">If you live in a city or a town, you probably hav a coaxial cable for </span>
    <span data-start="22.37">cable Internet, or a phone line if you have DSL, running to the outside of </span>
    <span data-start="26.88">your house, that connects you to the Internet Service Provider, or ISP. </span>
    <span data-start="32.1">If you live far out in the country, you'll more likely have </span>
    <span data-start="34.73">a dish outside your house, connecting you wirelessly to your closest ISP, or </span>
    <span data-start="39.43">you might also use the telephone system. </span>
    <span data-start="42.35">Whether a wire comes straight from the ISP hookup outside your house, or </span>
    <span data-start="46.3">it travels over radio waves from your roof, </span>
    <span data-start="49.27">the first stop a wire will make once inside your house, is at your modem. </span>
    <span data-start="53.76">A modem is what connects the internet to your network at home. </span>
    <span data-start="57.78">A few common residential modems are DSL are...</span>
  </p>
</div>
4. Customize the video controls in the CSS
#videoControls {
  position: absolute;
  top: 90%;
  left: 1.5%;
  right: 1.5%;
  padding: 5px;
}

#progress {
  width: 0%;
  position: absolute;
  top: -10px;
  -webkit-appearance: none;
  background-color: #ff9900;
  height: 5px;
  z-index: 1;
  pointer-events: none;
}

#progressBar {
  width: 98.5%;
  position: absolute;
  top: -10px;
  right: 1%;
  -webkit-appearance: none;
  background-color: #6d6e6d;
  height: 5px;
  z-index: 0;
}

#progressBar:focus { outline: none; }
#progressBar::-webkit-slider-thumb {
 -webkit-appearance: none !important;
 height: 0;
 width: 0;
}
#progressBar::-moz-range-thumb {
 visibility: hidden !important;
}

#buttons {
  opacity: 0;
  transition: opacity .3s ease-out;
}

#videoContainer:hover #buttons { opacity: 1.0; }

#duration, #fastFwd {
  color: white;
  font-family: 'Varela Round', sans-serif;
  font-size: 14px;
  position: relative;
  bottom: 5px;
  left: 5px;
}

#mute, #closedCaption, #fullScreen, #volumeBar { float: right; }

#volumeSlider {
  width: 60px;
  float: right;
}
#volumeSlider::-webkit-slider-thumb {
 background-color: green;
 height: 10px;
 width: 10px;
}
5. Include jQuery JavaScript library and the app.js at the bottom of the webpage. That's it.
<script src="//code.jquery.com/jquery-2.2.3.min.js"></script>
<script src="js/app.js"></script>
This awesome jQuery plugin is developed by TsavoNeal. For more Advanced Usages, please check the demo page or visit the official website.