Create Windows Like File/Folder Views With jQuery - Desktopify
| File Size: | 51.2 KB |
|---|---|
| Views Total: | 2029 |
| Last Update: | |
| Publish Date: | |
| Official Website: | Go to website |
| License: | MIT |
Desktopify is a jQuery plugin to create a Microsoft Windows like desktop containing shortcut, file, and folder views using HTML, JavaScript, and CSS.
Features:
- Draggable windows.
- Reorder files using drag and drop.
- Multi-item selection.
- Delete items with a confirm dialog.
- Move items (files or folders) between windows and folders.
How to use it:
1. Load the Desktopify plugin and other required resources in the HTML page.
<!-- Stylesheet -->
<link rel="stylesheet" href="./index.css" />
<!-- jQuery -->
<script src="/path/to/jquery.min.js"></script>
<!-- Desktopify Plugin -->
<script src="./lib/desktopify.js"></script>
<!-- Draggable Plugin -->
<script src="./lib/draggable.js"></script>
2. Initialize the Desktopify on a container element where you want to generate the Windows desktop.
<div id="desktop">
  Shortcuts & Windows Here
</div>
$('#desktop').desktopify({
  // options here
});
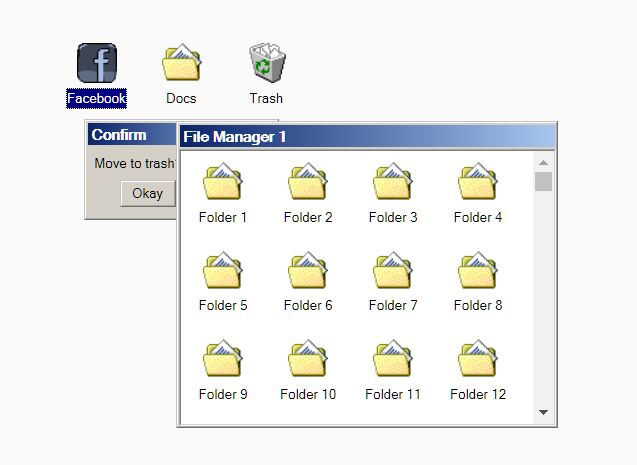
3. Add shortcuts to the desktop.
<a class="ui-icon" href="#">
  <div class="icon-fb"></div>
  <span>Facebook</span>
</a>
<a class="ui-icon" href="#" data-kind="folder">
  <div class="icon-docs"></div>
  <span>Docs</span>
</a>
<a class="ui-icon" href="#" data-kind="folder" data-moveable="false" id="icon-trash">
  <div class="icon-trash"></div>
  <span>Trash</span>
</a>
4. Add file explorer to the desktop.
<div class="window explorer" id="explorer-1">
  <div class="ui-title-bar"><span>File Manager 1</span></div>
  <div class="ui-folder-view"></div>
</div>
<div class="window explorer" id="explorer-2">
  <div class="ui-title-bar"><span>File Manager 2</span></div>
  <div class="ui-folder-view"></div>
</div>
...
// enable draggable
$('.window').draggable({
  handle: '.ui-title-bar'
});
5. All possible options to customize the plugin.
$('#desktop').desktopify({

  // parent element
  element: '',

  // exclude elements
  exclude: '',

  // default CSS classes
  iconClass: 'ui-icon',
  ghostClass: 'ui-ghost',
  selectedClass: 'ui-selected',
  selectingClass: 'ui-selecting',
  dropTargetClass: 'ui-drop-target',
  ghostContainerClass: 'ui-ghost-container',

  // default HTML
  rectangleHtml: '<div class="ui-rectangle"/>',
  indicatorHtml: '<div class="ui-indicator"/>',

  // config autoScroll here
  autoScrollSpeed: 6,
  autoScrollPlay: 30,
  autoScrollGap: 5,

  // offset in pixels
  ghostOffset: 10,

  // enable/disable reorder
  reorder: true

});
6. Callback functions.
$('#desktop').desktopify({

  onReposition: function (items) { },
  onBeforeDelete: function (items, callback) { },
  onDelete: function (items) { },
  onBeforeHover: function (target, items) { return false; },
  onHover: function (items) { },
  onBeforeMove: function (items) { return []; },
  onMove: function (items) { },
  onDragOver: function (data) { return false; },
  onDropItems: function (target, items) { },
  onDropData: function (data) { }

});
7. You are also allowed to pass the options globally as follows:
$.fn.desktopify.defaults.onDropData = function (data) {
  ...
}

$.fn.desktopify.defaults.indicatorHtml = '<div class="ui-indicator"><div></div><span></span></div>';

...
More Resources:
To build a retro Microsoft Windows experience on the web page, here are a few more resources we found on the web:
- Retro windows 95 Style UI Framework Based On jQuery And Bootstrap 4
- Windows 98 CSS Framework – 98.css
- Windows 95 Theme For Bootstrap 4 – Win95.css
This awesome jQuery plugin is developed by midasw. For more Advanced Usages, please check the demo page or visit the official website.