Create A Wizard Interface From Bootstrap Tabs - TabWizard
| File Size: | 19 KB |
|---|---|
| Views Total: | 3825 |
| Last Update: | |
| Publish Date: | |
| Official Website: | Go to website |
| License: | MIT |
A lightweight jQuery plugin that lets you quickly generate a step-by-step wizard interface using Bootstrap's Tabs component.
Features:
- Previous & Next navigation buttons.
- Next/Previous/Finish event handlers.
- Simple, fast, and easy to integrate into your project.
How to use it:
1. Download and insert the minified version of the TabWizard plugin after jQuery & Bootstrap JS.
<!-- Stylesheet -->
<link rel="stylesheet" href="/path/to/cdn/bootstrap.min.css" />
<!-- jQuery + Bootstrap JS -->
<script src="/path/to/cdn/jquery.slim.min.js"></script>
<script src="/path/to/cdn/bootstrap.min.js"></script>
<!-- TabWizard Plugin -->
<script src="/path/to/jquery-bootstrap-tab-wizard.min.js"></script>
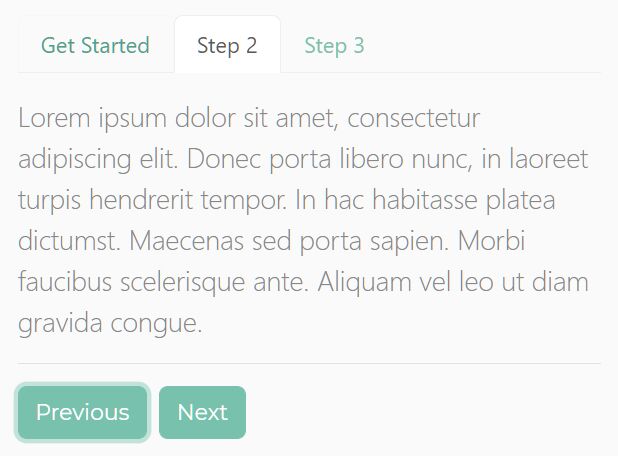
2. Create a Bootstrap tabs component and insert it together with the Previous & Next navigation buttons into the TabWizard container.
<div id="myWizard">

  <!-- Tabs Component -->
  <ul class="nav nav-tabs" id="myTab" role="tablist">
    <li class="nav-item">
      <a class="nav-link active" id="home-tab" data-toggle="tab" href="#step1" role="tab" aria-controls="step1"
         aria-selected="true">Get Started</a>
    </li>
    <li class="nav-item">
      <a class="nav-link" id="profile-tab" data-toggle="tab" href="#step2" role="tab"
         aria-controls="step2" aria-selected="false">Step 2</a>
    </li>
    <li class="nav-item">
      <a class="nav-link" id="contact-tab" data-toggle="tab" href="#step3" role="tab"
         aria-controls="step3" aria-selected="false">Step 3</a>
    </li>
  </ul>
  <div class="tab-content" id="myTabContent">
    <div class="tab-pane fade show active" id="step1" role="tabpanel" aria-labelledby="home-tab"><p class="lead mt-3">This is the first step.</p></div>
    <div class="tab-pane fade" id="step2" role="tabpanel" aria-labelledby="profile-tab"><p class="lead mt-3">This is the second step.</p></div>
    <div class="tab-pane fade" id="step3" role="tabpanel" aria-labelledby="contact-tab"><p class="lead mt-3">This is the last step.</p></div>
  </div>
  <hr/>

  <!-- Controls -->
  <div class="row">
    <button class="btn btnPrev btn-primary mr-1 ml-auto">Previous</button>
    <button class="btn btnNext btn-primary">Next</button>
  </div>

</div>
3. Call the function on the top container to initialize the wizard interface.
$('#myWizard').TabWizard();
4. Create additional buttons that can be used to indicate on which step you're viewing in the wizard.
<!-- Controls -->
<div class="row">
  <button class="btn btnTab1 btn-primary mr-1 d-none">Tab 1</button>
  <button class="btn btnTab2 btn-secondary mr-1 d-none">Tab 2</button>
  <button class="btn btnPrev btn-primary mr-1 ml-auto">Previous</button>
  <button class="btn btnNext btn-primary">Next</button>
</div>
$('#myWizard').TabWizard({
  additionalButtons: [
    {
      tab: '#tab1',
      buttons: ['.btnTab1']
    },
    {
      tab: '#tab2',
      buttons: ['.btnTab2', '.btnTab1']
    }]
});
5. Execute a function when you finish the step. Useful for form validation & submission.
$('#myWizard').TabWizard({
  onFinish: function (callback) {
    if (typeof  callback === 'function') {
      callback();
    }
  }
});
6. Determine whether to show/hide tabs. Default: true.
$('#myWizard').TabWizard({
  showTabs: false
});
7. Customize the label text for the Finish button. Default: 'Finish'.
$('#myWizard').TabWizard({
  finishButtonText: 'Submit'
});
8. Override the default CSS selectors of the Next/Prev buttons.
$('#myWizard').TabWizard({
  nextButtonClass: '.btnNext',
  previousButtonClass: '.btnPrevious'
});
This awesome jQuery plugin is developed by JunaidQadirB. For more Advanced Usages, please check the demo page or visit the official website.