Add Customizable Layer To HTML5 Videos - jqVideoLayer
| File Size: | 322 KB |
|---|---|
| Views Total: | 6934 |
| Last Update: | |
| Publish Date: | |
| Official Website: | Go to website |
| License: | MIT |

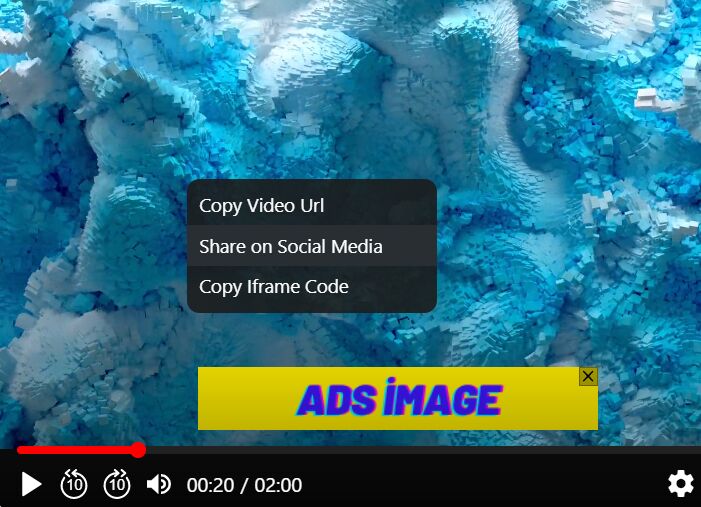
The jQuery Video Layer plugin adds dynamic, customizable layers to your HTML5 video player as you seen in the Youtube videos. The in-video overlay layers automatically show and hide depending on the video time. Supports any content such as ads, text, images, etc.
How to use it:
1. The plugin requires jQuery and jQuery UI libraries loaded in the document.
<link rel="stylesheet" href="https://cdnjs.cloudflare.com/ajax/libs/jqueryui/1.12.1/jquery-ui.structure.min.css">
<script src="https://cdnjs.cloudflare.com/ajax/libs/jquery/3.3.1/jquery.min.js"></script>
<script src="https://cdnjs.cloudflare.com/ajax/libs/jqueryui/1.12.1/jquery-ui.min.js"></script>
2. Load the jQuery Video Layer plugin's files in the document.
<link rel="stylesheet" href="dist/video-layers.structure.css">
<link rel="stylesheet" href="dist/video-layers.theme-default.css">
<script src="dist/jquery.video-layers.js"></script>
3. Embed a standard HTML5 video in the document.
<video controls>
  <source src="sample.mp4" type="video/mp4">
  <source src="sample.ogg" type="video/ogg">
  Your browser does not support HTML5 video.
</video>
4. Create your own layers overlaid in the video while playing.
<div id="external-layer" class="layer">
  Layer in container
</div>

 <div id="layer-img" class="layer">
  <img src="bg.jpg">
</div>

..
5. Call the function to enable the video layers.
$("video").videoLayers({
  layers:[
    {
      element:"#external-layer",
      appendToLayers:false, //by default the layers are appended to the layer container
      start:1,
      stop:4,
      show:{effect:"fade",duration:1000},
      hide:{effect:"fade",duration:1000}
    },
    {
      element:"#layer-img",
      cssClass:"addThisClass and This One c-video-layers__layer--strip",
      styles:{
          width:"50%"
      },
      position:{
          my:"center",
          to:"center"
      },
      start:5,
      stop:10,
      show:{effect:"fade",duration:1000},
      hide:{effect:"blind",duration:500}
    }
  ]
})
6. You can also create the overlays directly in the JavaScript during init.
$("video").videoLayers({
  layers:[
    {
      content:"Some text for the layer",
      position:[25,25],
      start:1,
      stop:4
    },
  ]
})
7. All default configuration options.
$("video").videoLayers({
  namespace: "jq-videolayers",
  classes: {
      root: "c-video-layers",
      video: "c-video-layers__video",
      layer: "c-video-layers__layer",
      visible: "c-video-layers__visible",
      layersContainer: "c-video-layers__container"
  },
  layers: []
})
8. Available event handlers.
$("video").videoLayers()
.on(jqVideoLayers.VideoLayersEvents.beforeShowLayer,(e,data)=>{
  // before show
}).on(jqVideoLayers.VideoLayersEvents.showLayer,(e,data)=> {
  // when the layer is shown
}).on(jqVideoLayers.VideoLayersEvents.beforeHideLayer,(e,data)=>{
  // before hide
}).on(jqVideoLayers.VideoLayersEvents.hideLayer,(e,data)=> {
  // when the layer is hidden
})
This awesome jQuery plugin is developed by davinchi-finsi. For more Advanced Usages, please check the demo page or visit the official website.