Flick-style Image Annotation Library for Vanilla JS, jQuery & React
| File Size: | 1.2 MB |
|---|---|
| Views Total: | 5330 |
| Last Update: | |
| Publish Date: | |
| Official Website: | Go to website |
| License: | MIT |
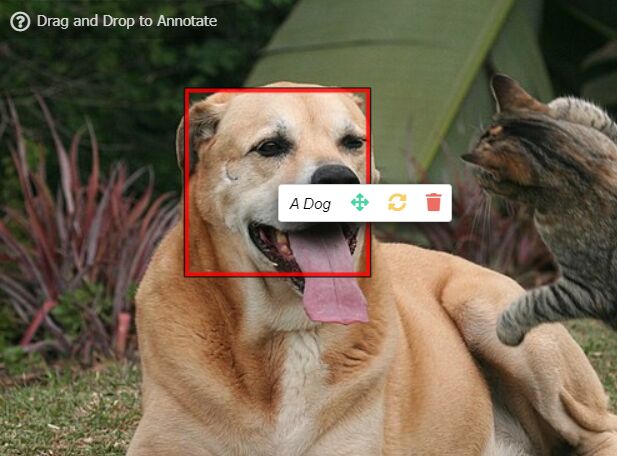
Annotate Image is a JavaScript image annotation library that creates Flickr-style comment annotations on images.
You can draw rectangular regions on any image and attach interactive hotspots and notes to those regions. to those regions.
Version 2.0 is a complete TypeScript rewrite that works standalone with vanilla JavaScript or integrates with jQuery, React, and Vue.
It's ideal for building photo galleries, design review tools, or any application requiring collaborative image markup.
Features:
- Tree-Shakeable: Each framework adapter is a separate bundle. Import only what you use.
- Keyboard Accessible: Full keyboard navigation with Tab, Enter, Space, and Escape support.
- Lifecycle Callbacks: Hook into onChange, onSave, onDelete, and onLoad events.
- Server Persistence: Optional API integration via fetch or custom functions.
- Modern Browser Support: Uses pointer events and fetch API.
Use Cases:
- eCommerce Product Tagging: Mark specific items in a lifestyle photo with links to product pages.
- Bug Reporting Tools: Allow users to highlight visual errors on screenshots and attach descriptive notes.
- Collaborative Design Feedback: Teams can annotate design mockups with specific change requests.
- Social Photo Sharing: Enable users to tag friends or objects in uploaded photos, similar to Facebook or Flickr.
Installation:
1. Install the annotate-image and OPTIONAL framework dependencies.
# NPM
$ npm install annotate-image
# For jQuery projects
npm install jquery

# For React projects
npm install react react-dom

# For Vue projects
npm install vue
How To Use It (Vanilla JavaScript):
1. Import the Annotate Image library into your project.
// ES Module
import { annotate } from 'annotate-image';
import 'annotate-image/css';
<!-- Browser -->
<link rel="stylesheet" href="dist/css/annotate.min.css">
<script src="dist/core.min.js"></script>
2. Initialize the annotation layer on an image:
// Get the image element
const imageElement = document.getElementById('myImage');
// Create annotation instance with configuration
const instance = AnnotateImage.annotate(imageElement, {
editable: true, // Allow users to create and edit annotations
// Pre-populate with existing annotations
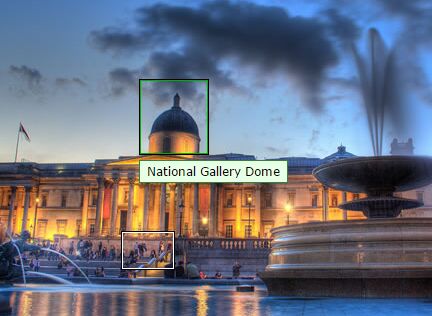
notes: [
{
top: 286, // Y position in pixels
left: 161, // X position in pixels
width: 52, // Annotation box width
height: 37, // Annotation box height
text: 'Small people on the steps',
id: 'note-1',
editable: false // This specific note cannot be edited
},
{
top: 134,
left: 179,
width: 68,
height: 74,
text: 'National Gallery Dome',
id: 'note-2',
editable: true
}
],
// Called whenever annotations change
onChange(notes) {
console.log('Current annotations:', notes);
}
// Re-scale annotations when the container resizes
autoResize: true,
});
// Programmatically control the instance
instance.add(); // Enter "add note" mode - user can draw a new region
instance.getNotes(); // Returns array of current annotations
instance.clear(); // Removes all annotations from the image
instance.destroy(); // Complete teardown - removes event listeners
3. The api option accepts either URL strings or custom functions for server integration:
const instance = annotate(imageElement, {
  api: {
    // URL string - uses default fetch behavior
    load: '/api/annotations/load',

    // Custom function with full control
    save: async (note) => {
      const response = await fetch('/api/annotations/save', {
        method: 'POST',
        headers: { 'Content-Type': 'application/json' },
        body: JSON.stringify(note)
      });
      return response.json();  // Must return { id: string }
    },

    // URL string for delete
    delete: '/api/annotations/delete'
  }
});
4. All possible callback functions.
onChange(function): Callback invoked after any annotation mutation. Receives the updated notes array as a parameter.onSave(function): Callback invoked after a note is successfully saved. Receives the saved note object as a parameter.onDelete(function): Callback invoked after a note is successfully deleted. Receives the deleted note object as a parameter.onLoad(function): Callback invoked after notes are loaded from the server. Receives the loaded notes array as a parameter.onError(function): Callback invoked when API operations fail. Receives an error context object withtype,error, and optionalnoteproperties. Defaults toconsole.errorif not provided.
$("#img-to-annotate").annotateImage({
  getUrl: 'your-get.rails',
  saveUrl: 'your-save.rails',
  deleteUrl: 'your-delete.rails'
});
5. Event handlers.
// Triggered after any annotation is added, modified, or deleted
// Receives the complete updated notes array
instance.onChange = function(notes) {
  console.log('Total annotations:', notes.length);
  // Save to localStorage, sync with state management, etc.
};

// Triggered after a note is saved (either created or edited)
// Receives the individual note object
instance.onSave = function(note) {
  console.log('Note saved with ID:', note.id);
  // Send analytics event, show success message, etc.
};

// Triggered after a note is deleted
// Receives the deleted note object
instance.onDelete = function(note) {
  console.log('Deleted note:', note.text);
  // Update UI, log to server, etc.
};

// Triggered after notes are loaded from the server
// Receives the loaded notes array
instance.onLoad = function(notes) {
  console.log('Loaded', notes.length, 'notes from server');
  // Hide loading spinner, update counter, etc.
};

// Triggered when API operations fail
// Receives context object with error details
instance.onError = function(context) {
  console.error('Operation failed:', context.type);
  console.error('Error message:', context.error.message);
  if (context.note) {
    console.error('Failed note:', context.note);
  }
  // Show error notification to user
};
How To Use It (jQuery):
<link rel="stylesheet" href="dist/css/annotate.min.css">
<script src="/path/to/cdn/jquery.slim.min.js"></script>
<script src="dist/jquery.min.js"></script>
$(function() {
  $('#myImage').annotateImage({
    editable: true,
    notes: [
      {
        top: 100,
        left: 150,
        width: 80,
        height: 60,
        text: 'Click to edit this annotation',
        id: 'note-example'
      }
    ],

    // Callback when any note changes
    onChange(notes) {
      console.log('Notes updated:', notes);
    }
  });
});

// Destroy the annotation layer
$('#myImage').annotateImage('destroy');
How To Use It (React):
import { useRef } from 'react';
import { AnnotateImage } from 'annotate-image/react';
import type { AnnotateImageRef } from 'annotate-image/react';
import 'annotate-image/css';

function App() {
  // Create ref to access instance methods
  const ref = useRef<AnnotateImageRef>(null);

  return (
    <>
      <AnnotateImage
        ref={ref}
        src="/photo.jpg"      // Image URL
        width={800}           // Image width in pixels
        height={600}          // Image height in pixels
        editable              // Enable annotation editing
        notes={[]}            // Initial annotations array

        // Called when annotations change
        onChange={(notes) => console.log('Changed:', notes)}

        // Called after saving a note
        onSave={(note) => console.log('Saved:', note)}

        // Called after deleting a note
        onDelete={(note) => console.log('Deleted:', note)}
      />

      {/* Control buttons using ref methods */}
      <button onClick={() => ref.current?.add()}>
        Add New Note
      </button>
      <button onClick={() => console.log(ref.current?.getNotes())}>
        Get All Notes
      </button>
    </>
  );
}
How To Use It (Vue):
<script setup lang="ts">
import { ref } from 'vue';
import { AnnotateImage } from 'annotate-image/vue';
import 'annotate-image/css';

// Create template ref for instance access
const annotator = ref();
</script>

<template>
  <AnnotateImage
    ref="annotator"
    src="/photo.jpg"
    :width="800"
    :height="600"
    editable
    :notes="[]"

    @change="(notes) => console.log('Changed:', notes)"
    @save="(note) => console.log('Saved:', note)"
    @delete="(note) => console.log('Deleted:', note)"
  />

  <!-- Control buttons using exposed methods -->
  <button @click="annotator?.add()">Add Note</button>
  <button @click="console.log(annotator?.getNotes())">
    Get Notes
  </button>
</template>
FAQs:
Q: Can I use this library with server-side rendered React?
A: Yes. The React component works with Next.js and other SSR frameworks. Import the component dynamically with next/dynamic and set ssr: false to prevent hydration issues.
Q: How do I persist annotations to a database?
A: Use the api option to specify save and load endpoints. Pass a custom function that makes a fetch request to your backend. The save function must return an object with an id property. The load function must return an array of note objects. The library calls these functions automatically when users create or delete annotations.
Q: Does this work with responsive images that change size?
A: The annotation layer uses absolute positioning based on the original image dimensions. If your image is responsive, you need to reinitialize the annotation layer after resize events. Call destroy() followed by a new annotate() call with updated dimensions. Alternatively, set fixed dimensions on the image container.
Q: Can I customize the appearance of annotation boxes?
A: Yes. The library applies CSS classes to annotation elements. Override these classes in your own stylesheet.
See Also:
Changelog:
v2.0.0beta 2 (2026-03-07)
- Code refactor
- add autoResize option to AnnotateImageOptions
v2.0.0 (2026-02-17)
- Package renamed from jquery-image-annotate to annotate-image
- Rewritten in TypeScript with vanilla DOM internals
- Removed jQuery UI dependency — drag/resize uses vanilla pointer events
- Added core vanilla JS API (annotate() factory) that works without jQuery
- jQuery adapter is now a thin wrapper registering $.fn.annotateImage
- Added React 18+ and Vue 3+ framework components
- Lifecycle callbacks: onChange, onSave, onDelete, onLoad
- getNotes() method for reading current annotations
- Replaced $.ajax/$.getJSON with fetch
- Build system replaced: Bower/Grunt removed in favor of npm/esbuild
- Added ESM and IIFE bundle outputs with TypeScript declarations
- Supports jQuery 3.x and 4.x
- Keyboard accessibility for all interactive elements
- Full test suite using Vitest
This awesome jQuery plugin is developed by flipbit. For more Advanced Usages, please check the demo page or visit the official website.