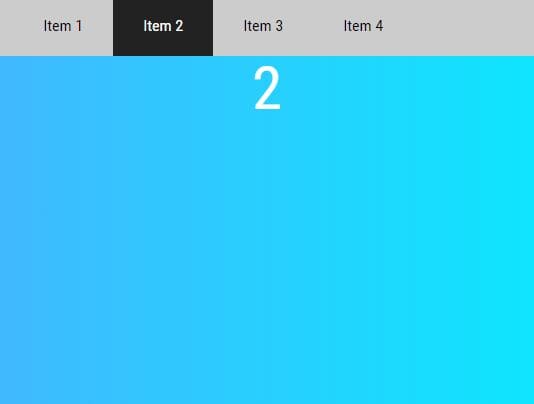
Google I/O 2015 Tabbed Navigation Using jQuery and CSS3
| File Size: | 2.23 KB |
|---|---|
| Views Total: | 2799 |
| Last Update: | |
| Publish Date: | |
| Official Website: | Go to website |
| License: | MIT |

Makes use of jQuery and CSS3 to create a Material Design styled tabbed navigation with a nice ripple click effect as you seen on Google I/O 2015 website.
See also:
How to use it:
1. Create a tabbed navigation from a nav list.
<nav>
  <ul class="papertabs">
    <li>
      <a href="#" class="active">
        Agenda
        <span class="paperripple">
          <span class="circle"></span>
        </span>
      </a>
    </li>
    <li>
      <a href="#">
        Day 1
        <span class="paperripple">
          <span class="circle"></span>
        </span>
      </a>
    </li>
    <li>
      <a href="#">
        Day 2
        <span class="paperripple">
          <span class="circle"></span>
        </span>
      </a>
    </li>
      <li>
      <a href="#">
        My Schedule
        <span class="paperripple">
          <span class="circle"></span>
        </span>
      </a>
    </li>
  </ul>
</nav>
2. The primary CSS styles for the tabbed navigation.
* { box-sizing: border-box; }

nav {
  margin: 0 auto;
  display: table;
}

.papertabs {
  margin: 0;
  padding: 0;
  list-style: none;
  position: relative;
  overflow: hidden;
 *zoom: 1;
}

.papertabs li { float: left; }

.papertabs a {
  color: inherit;
  text-decoration: none;
  text-transform: uppercase;
  font-weight: 500;
  letter-spacing: 0.02em;
  padding: 16px 12px;
  line-height: 1;
  float: left;
  position: relative;
}
3. Create a bottom slider that moves as you click on a tab menu.
#papertabs-line {
  background: #fff;
  position: absolute;
  height: 2px;
  bottom: 0;
}
4. Create the Material Design ripple click effect.
.papertabs a.pressed .paperripple .circle {
  -moz-animation: ripple 0.25s ease-in;
  -webkit-animation: ripple 0.25s ease-in;
  animation: ripple 0.25s ease-in;
}

.papertabs a.focused .paperripple {
  background: rgba(255, 255, 255, 0.25);
  transition: none;
}

.paperripple {
  position: absolute;
  width: 100%;
  height: 100%;
  top: 0;
  left: 0;
  overflow: hidden;
  background: rgba(255, 255, 255, 0);
  -moz-transition: ease-in 0.4s;
  -o-transition: ease-in 0.4s;
  -webkit-transition: ease-in 0.4s;
  transition: ease-in 0.4s;
}

.paperripple .circle {
  position: absolute;
  width: 0;
  height: 0;
  top: 50%;
  left: 50%;
  background: rgba(255, 255, 255, 0);
  -moz-border-radius: 50%;
  -webkit-border-radius: 50%;
  border-radius: 50%;
  -moz-transform: translate(-50%, -50%);
  -ms-transform: translate(-50%, -50%);
  -webkit-transform: translate(-50%, -50%);
  transform: translate(-50%, -50%);
}

@-moz-keyframes
ripple {  0% {
 background: rgba(255, 255, 255, 0);
}
 25% {
 background: rgba(255, 255, 255, 0.55);
 width: 15%;
 padding-bottom: 15%;
}
 50% {
 background: rgba(255, 255, 255, 0.45);
 width: 85%;
 padding-bottom: 85%;
}
 100% {
 width: 200%;
 padding-bottom: 200%;
 background: rgba(255, 255, 255, 0.25);
}
}

@-webkit-keyframes
ripple {  0% {
 background: rgba(255, 255, 255, 0);
}
 25% {
 background: rgba(255, 255, 255, 0.55);
 width: 15%;
 padding-bottom: 15%;
}
 50% {
 background: rgba(255, 255, 255, 0.45);
 width: 85%;
 padding-bottom: 85%;
}
 100% {
 width: 200%;
 padding-bottom: 200%;
 background: rgba(255, 255, 255, 0.25);
}
}

@keyframes
ripple {  0% {
 background: rgba(255, 255, 255, 0);
}
 25% {
 background: rgba(255, 255, 255, 0.55);
 width: 15%;
 padding-bottom: 15%;
}
 50% {
 background: rgba(255, 255, 255, 0.45);
 width: 85%;
 padding-bottom: 85%;
}
 100% {
 width: 200%;
 padding-bottom: 200%;
 background: rgba(255, 255, 255, 0.25);
}
}
4. The jQuery script to enable the tabbed navigation. Add the following JavaScript snippet after your jQuery JavaScript library and done.
$(function () {
    $('.papertabs').append('<li id=\'papertabs-line\'></li>');
    var $line = $('#papertabs-line');
    var $activeItem = $('.papertabs .active').parent();
    var $activeX = $('.papertabs .active').parent().position().left;
    $line.width($activeItem.width()).css('left', $activeX);
    $('.papertabs a').click(function (e) {
        var $el = $(this);
        var $offset = $el.offset();
        var $clickX = e.pageX - $offset.left;
        var $clickY = e.pageY - $offset.top;
        var $parentX = $el.parent().position().left;
        var $elWidth = $el.parent().width();
        e.preventDefault();
        $('.papertabs .active').removeClass('active');
        $el.addClass('pressed active');
        $el.find('.circle').css({
            left: $clickX + 'px',
            top: $clickY + 'px'
        });
        $line.animate({
            left: $parentX,
            width: $elWidth
        });
        $el.on('animationend webkitAnimationEnd oAnimationEnd MSAnimationEnd', function () {
            $el.removeClass('pressed').addClass('focused');
            setTimeout(function () {
                $el.removeClass('focused');
            }, 800);
        });
    });
});
This awesome jQuery plugin is developed by creativenath. For more Advanced Usages, please check the demo page or visit the official website.