Easy Custom Checkbox And Radio Input Plugin With jQuery - ezMark
| File Size: | 17 KB |
|---|---|
| Views Total: | 1770 |
| Last Update: | |
| Publish Date: | |
| Official Website: | Go to website |
| License: | MIT |
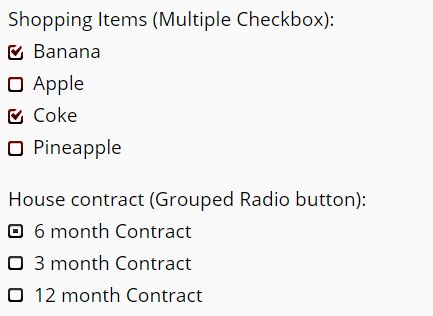
ezMark is a lightweight jQuery plugin which lets you create cross browser, easy-to-stylize checkboxes and radio buttons.
How to use it:
1. Put the following files into your web project.
- js/ezmark.jquery.js - The Plugin File
- css/ezmark.css - The CSS File for styling
- images/ - The replacement images for checkbox and radiobutton
2. Include jQuery library and the jQuery ezMark's JS & CSS files on the html page.
<link href="cs/ezmark.css" rel="stylesheet">
<script src="//code.jquery.com/jquery.min.js"></script>
<script src="jquery.ezmark.js"></script>
3. To apply on all checkbox and radio button across the page, use:
$('input').ezMark();
4. To use multiple styled checkbox in the same page, at first declare a class in the CSS for the new checkbox/radiobutton. For example:
.ez-checkbox-green {
  background: transparent url('images/checkbox-green.png') 0 1px no-repeat;
  display: inline-block;
}

.ez-checked-green { background-position: 0 -18px; }
5. Then call:
$('selector').ezMark({
  checkboxCls: 'ez-checkbox-green',
  checkedCls: 'ez-checked-green'
});
6. The method ezMark accepts the following optional parameters as JSON:
$('selector').ezMark({

  // custom Checkbox Class
  checkboxCls: 'ez-checkbox'

  // checkbox Checked State's Class
  checkedCls: 'ez-checked',

  // custom radiobutton Class
  radioCls: 'ez-radio',

  // radiobutton's Selected State's Class
  selectedCls: 'ez-selected',

  hideCls     : 'ez-hide'

});
This awesome jQuery plugin is developed by itsalif. For more Advanced Usages, please check the demo page or visit the official website.