Dynamic Multi-level Context Menu For Bootstrap - jQuery ContextMenu.js
| File Size: | 38 KB |
|---|---|
| Views Total: | 7445 |
| Last Update: | |
| Publish Date: | |
| Official Website: | Go to website |
| License: | MIT |
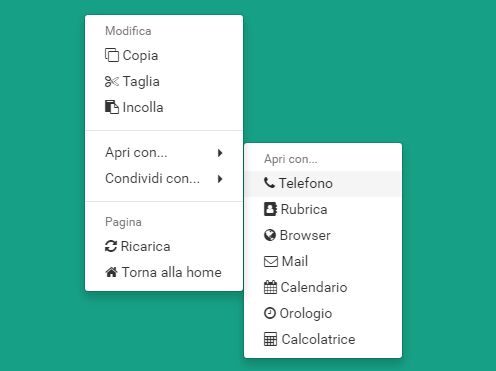
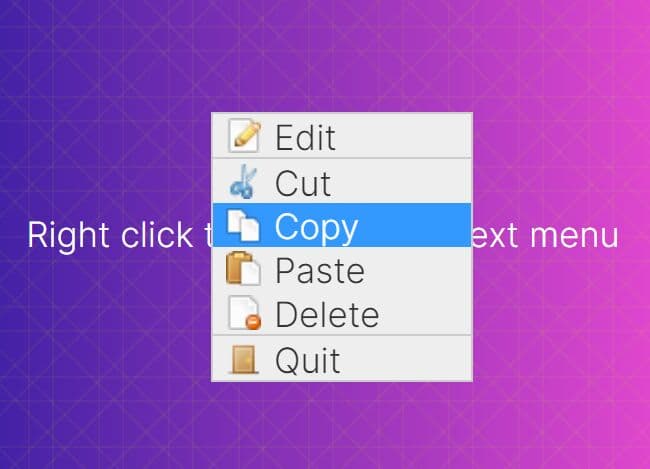
ContextMenu.js is a jQuery plugin which helps you create a dynamic, responsive, multi-level context menu with intelligent position using Bootstrap dropdown component.
The context menu will auto reposition itself when there's not enough screen space.
How to use it:
1. Load the necessary jQuery library, tether.js and Bootstrap framework in the html page.
<link rel="stylesheet" href="/path/to/bootstrap.min.css">
<script src="/path/to/jquery.min.js"></script>
<script src="/path/to/bootstrap.min.js"></script>
<script src="/path/to/tether.min.js"></script>
2. Load the Font Awesome for the menu icons (OPTIONAL).
<link rel="stylesheet" href="/path/to/font-awesome.min.css">
3. Insert your menu items into nested JS objects as follows:
let _menuItems = [

  {
      type: "title",
      text: "Modifica"
  },
  {
      type: "item",
      icon: "clone",
      text: "Copia",
      key: "copy",
      action: _debug
  },
  {
      type: "item",
      icon: "scissors",
      text: "Taglia",
      key: "cut",
      action: _debug
  },
  {
      type: "item",
      icon: "clipboard",
      text: "Incolla",
      key: "paste",
      action: _debug
  },
  {
      type: "divider"
  },
  {
      type: "submenu",
      text: "Apri con...",
      items: [

          {
              type: "title",
              text: "Apri con..."
          },
          {
              type: "item",
              icon: "phone",
              text: "Telefono",
              key: "phone",
              action: _debug
          },
          {
              type: "item",
              icon: "address-book",
              text: "Rubrica",
              key: "addresses",
              action: _debug
          },
          {
              type: "item",
              icon: "globe",
              text: "Browser",
              key: "browser",
              action: _debug
          },
          {
              type: "item",
              icon: "envelope-o",
              text: "Mail",
              key: "mail",
              action: _debug
          },
          {
              type: "item",
              icon: "calendar",
              text: "Calendario",
              key: "calendar",
              action: _debug
          },
          {
              type: "item",
              icon: "clock-o",
              text: "Orologio",
              key: "clock",
              action: _debug
          },
          {
              type: "item",
              icon: "calculator",
              text: "Calcolatrice",
              key: "calc",
              action: _debug
          }
      ]
  },
  {
      type: "submenu",
      text: "Condividi con...",
      items: [

          {
              type: "title",
              text: "Condividi con..."
          },
          {
              type: "item",
              icon: "google-plus-official",
              text: "Google+",
              key: "google_plus",
              action: _debug
          },
          {
              type: "item",
              icon: "facebook-official",
              text: "Facebook",
              key: "facebook",
              action: _debug
          },
          {
              type: "item",
              icon: "twitter",
              text: "Twitter",
              key: "twitter",
              action: _debug
          }
      ]
  },
  {
      type: "divider"
  },
  {
      type: "title",
      text: "Pagina"
  },
  {
      type: "item",
      icon: "refresh",
      text: "Ricarica",
      action: function()
      {
          window.location.reload();
      }
  },
  {
      type: "item",
      icon: "home",
      text: "Torna alla home",
      action: function()
      {
          window.location.href = "/";
      }
  }
];
4. The required menu styles. Copy the CSS snippets as shown below and then paste them into your existing CSS file.
.context-menu.dropdown-menu {
  display: block;
  left: 0px;
  opacity: 0;
  position: absolute;
  top: 0px;
  transition: visibility 0s 0.1s, opacity 0.1s linear;
  visibility: hidden;
}

.context-menu.dropdown-menu.open {
  visibility: visible;
  opacity: 1;
  transition: opacity 0.1s linear;
}

.context-menu.dropdown-menu a { cursor: pointer; }

.dropdown-submenu .dropdown-toggle:after {
  content: "\f0da";
  display: inline-block;
  float: right;
  font: normal normal normal 14px/1 FontAwesome;
  font-size: inherit;
  padding-top: 3px;
  text-rendering: auto;
  -webkit-font-smoothing: antialiased;
}

.dropdown-submenu .dropdown-menu {
  top: 0;
  left: 100%;
}

#cnxt-cursor {
  height: 0px;
  opacity: 0;
  position: absolute;
  visibility: hidden;
  width: 0px;
}
5. Enable the context menu on the whole window.
$(window).contextMenu({

  items: _menuItems

});
This awesome jQuery plugin is developed by Byloth. For more Advanced Usages, please check the demo page or visit the official website.