Basic Image Preview Before Uploading - jQuery Image Reader
| File Size: | 9.73 KB |
|---|---|
| Views Total: | 6826 |
| Last Update: | |
| Publish Date: | |
| Official Website: | Go to website |
| License: | MIT |
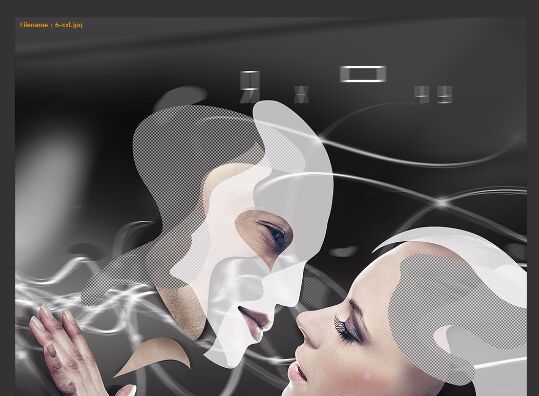
Image Reader is a jQuery plugin to create a drag-and-drop image upload area with support for file preview (render as image or canvas) before uploading to the server. Based on the normal file input field.
Allowed image types:
- 'image/jpeg',
- 'image/jpg',
- 'image/png',
- 'image/gif',
- 'image/svg+xml',
- 'image/bmp',
- 'image/x-icon',
- 'image/vnd.microsoft.icon'
Installation:
# NPM
$ npm install jquery-image-reader --save

# Bower
$ bower install jquery-image-reader
How to use it:
1. Create the drag-and-drop file uploader and image preview area on the web page.
<div class="drop">
  <div class="uploader">
    <label class="drop-label">Drag and drop images here</label>
    <input type="file" class="image-upload" id="photo" name="photo" accept="image/*" multiple>
  </div>
  <div id="image-preview"></div>
</div>
2. Put jQuery library and the jQuery Image Reader plugin's script at the bottom of the page.
<script src="//code.jquery.com/jquery-3.2.1.min.js"></script>
<script src="jquery.imagereader.js"></script>
3. Call the plugin on the file input field and done.
$('#photo').imageReader();
4. Style the image uploader with the following CSS snippets:
.drop { background-color: #fff; }

.drop:after { border: dashed 0.3rem rgba(0, 0, 0, 0.0875); }

.drop .drop-label { color: rgba(0, 0, 0, 0.0875); }

.drop:hover:after { border-color: rgba(0, 0, 0, 0.125); }

.drop:hover .drop-label { color: rgba(0, 0, 0, 0.125); }

#image-preview, .image-preview { background-color: #000; }

.drop {
  min-width: 200px;
  min-height: 20rem;
  position: relative;
  overflow: hidden;
  cursor: pointer;
  margin: 0;
}

.drop:after {
  content: "";
  position: absolute;
  top: 0;
  right: 0;
  left: 0;
  bottom: 0;
}

.drop.file-focus { border: 0; }

.drop:hover { cursor: pointer; }

.drop .drop-label {
  font-size: 2.4rem;
  font-weight: 300;
  line-height: 4rem;
  width: 32rem;
  text-align: center;
  position: absolute;
  top: 50%;
  margin-top: -1.5rem;
  left: 50%;
  margin-left: -16rem;
}

.drop input[type=file] {
  line-height: 50rem;
  position: absolute;
  top: 0;
  right: 0;
  bottom: 0;
  left: 0;
  height: 100%;
  width: 100%;
  opacity: 0;
  z-index: 10;
  cursor: pointer;
}

#image-preview, .image-preview {
  width: 100%;
  display: block;
  position: relative;
  z-index: 1;
}

#image-preview:empty, .image-preview:empty { display: none; }

#image-preview img, .image-preview img {
  display: block;
  margin: 0 auto;
  width: 100%
}

#image-preview:after, .image-preview:after {
  content: "";
  position: absolute;
  top: 0;
  bottom: 0;
  right: 0;
  left: 0;
  border: solid 0.1rem rgba(0, 0, 0, 0.08);
  background: bottom center repeat-x url(data:image/png;base64,iVBORw0KGgoAAAANSUhEUgAAAAEAAABfCAMAAAAeT108AAABEVBMVEUAAAAAAAAAAAAAAAAAAAAAAAAAAAAAAAAAAAAAAAAAAAAAAAAAAAAAAAAAAAAAAAAAAAAAAAAAAAAAAAAAAAAAAAAAAAAAAAAAAAAAAAAAAAAAAAAAAAAAAAAAAAAAAAAAAAAAAAAAAAAAAAAAAAAAAAAAAAAAAAAAAAAAAAAAAAAAAAAAAAAAAAAAAAAAAAAAAAAAAAAAAAAAAAAAAAAAAAAAAAAAAAAAAAAAAAAAAAAAAAAAAAAAAAAAAAAAAAAAAAAAAAAAAAAAAAAAAAAAAAAAAAAAAAAAAAAAAAAAAAAAAAAAAAAAAAAAAAAAAAAAAAAAAAAAAAAAAAAAAAAAAAAAAAAAAAAAAAAAAAAAAABoX7lMAAAAW3RSTlMBCHwGAwQFCgIMCw4PERITFBYXGRoNHR4gISIlJicpKiwuLzEzNDY3OTs8G0BBQ0VGSEpLTU9QUVRVVlhZW11eX2FiZGVmaGlrbG1ucHFyc3R1dnd4eXp7Pn1+eLXrxAAAADRJREFUCFtjYAACDmYGJkYmRiDJAMJMbEzMTP+ZeJgZmTChOFZR7FAPYi71IQMT0JXhTIwAN8YCxDyw89IAAAAASUVORK5CYII=);
}
5. You can also render the image preview as a canvas element:
$('#photo').imageReader({
  renderType: 'canvas',
  onload: function(canvas) {
    var ctx = canvas.getContext('2d');
    ctx.fillStyle = "orange";
    ctx.font = "12px Verdana";
    ctx.fillText("Filename : "+ this.name, 10, 20, canvas.width - 10);
    $(canvas).css({
      width: '100%',
      marginBottom: '-10px'
    });
  }
});
This awesome jQuery plugin is developed by ipanardian. For more Advanced Usages, please check the demo page or visit the official website.